Showing posts with label knitting. Show all posts

Saturday, February 24, 2007

counting beans, or playing with my food

I'm knitting mittens, and it's driving me nuts.

The first pair of mittens went well enough. I found a pattern I loved and fumbled my way through, producing a perfectly serviceable pair that I adore, errors and all, and wear every day.

I got more adventurous on the second pair, changing yarns (and therefore gauge) and size, as I was knitting these for my daughter. I chose a different pattern and, true to my nature, instantly made changes. (Can't do anything simple around here, nosiree bob.) This mitten, like the first, has an opening for fingers. It also had a new thumb gusset -- knitterly excitement!

The first mitten went pretty well. I only had to rip it back, oh, six or seven times, and that was for size issues. What really tripped me up was that thumb gusset: specifically, how to make it for the left hand. The pattern states,
Knit second mitten, being sure to reverse instructions to place flap on palm side of mitten.
(I didn't make the flap. I was following the pattern for the rest of the mitten. Well, actually, I changed the top, too, but that doesn't matter here.)

I just couldn't get that thumb gusset to end up on the left side of the mitten. What does it mean to reverse instructions? I counted stitches backwards and forwards, knit and ripped and knit and ripped.

What I needed was a visual aid. Legos? Playmobil flowers? I couldn't find enough similar pieces. No, I wanted something else:


Lima beans. Each line of beans represents stitches on a circular needle. (I'm using two circular needles instead of double-points.) They're joined into a circle, although I left the beans in straight lines. The arrows in the picture above point to stitch markers surrounding one knit stitch: the beginning of the (hopefully left-handed) gusset.


Now I've increased by making one stitch on the inside of each stitch marker.


Here is the final gusset round, having increased four times to make nine gusset stitches.


Now I've put the gusset stitches on a holder. I cast on three stitches to cover the gap, marked by arrows in the picture above.


Take the stitch markers off and hey presto, a side-seam thumb! It can be left- or right-handed!

Looking back at the original pattern, I see that the designer already knew that:
Knit second mitten, being sure to reverse instructions to place flap on palm side of mitten.

One reverses the instructions for the flap, not the thumb. D'oh.

I had tried the first mitten on so many times that it naturally formed around my right thumb. Because the first pair I knit had left- and right-oriented thumbs, I figured these did, too.

The pattern's author recommends Ann Budd's The Knitter's Handy Book of Patterns, so I surfed on over to Amazon and checked it out. I love that "search inside the book!" feature. Side-seam thumbs explained, just like in the pattern. I am such an idiot. And I'm buying that book.

It takes beans labeled with Sharpie pens to make me understand simple instructions. Please, when you meet me, speak very slowly and use short words. Visual aids will help. You'd better bring some beans.

Thursday, February 15, 2007

mittens for me


I so rarely knit for myself that I take real pleasure in the process. No deadline, no "will he or she like it?", and the fitting model is always right there.

These are Peekaboo Mittens from the February 2007 magknits. Several people on flickr have knit them already, so I wonder if they're going to be the next super-popular pattern like fetching fingerless mitts.

These are big mittens with a slit in the palm so you can slide your fingers out to handle keys, doorknobs, or the steering wheel of your car. They're big so they can fit over slim gloves if it's cold enough to layer (and it is, yes indeedy it is!).

I made mine with a strand of Jamieson Shetland, a nice old-fashioned bristly wool, and a strand of Baby Alpaca, for softness and warmth, held together. Because it knit to a much chunkier gauge than the pattern yarn, I adjusted the number of stitches down to 28 and did single ribbing around the slit (double ribbing, even on smaller needles, didn't contract with this yarn combination). I wanted a thick mitten, so I stuck with the size 7 needles, but wouldn't recommend that unless you don't mind tight knitting.

Every time I wear these mittens I am absurdly pleased. The color, the texture, and the fact that they are mine make me very happy.

Wednesday, January 17, 2007

try, try again

This headband is identical to the first one I made except for the edging (and lining color -- but it's the same brand and weight of yarn). This time I crocheted the lining and outer fabric together. It makes a neater finish, and I like the look of the crochet -- it reminds me of fancy piped frosting on a birthday cake.

But. It makes a much tighter fit. If I make this style again, I'll have to find a stretchier crochet stitch.

Ironically enough, it's too icy outside to put these headbands to use walking the dogs. Guess I'll have to make another headband!

Tuesday, January 16, 2007

Doing Things the Hard Way

Problem: cold ears when walking the dogs. Solution: knitted headband. Simple, right?

First, choose a pattern. None in the books I own. The ones I find online are too complicated (short rows, lace). Have to make up a pattern.

Since I want something simple, I decide on a simple stockinette headband with a lining. I don't know how to doubleknit, so I'll have to attach a lining. But how?

Elizabeth Zimmerman to the rescue. I use her instructions for creating a knitted hem, since that's essentially what a lining is.

So: measure head, establish gauge, subtract 2 inches for negative ease, cast on 60 stitches of the bulky yarn. Knit 18 rows. Bind off.

Following Zimmerman, knit into back loop of cast-on edge with my lining yarn, knit a round, decrease periodically to cut number of stitches by 10 percent, knit about half the lining and realize I don't know how to attach the lining to the top edge. Stop.

Turn headband over, knit a second "hem" the same way except attach it to the bound-off edge. Knit the other half of the lining.

Now, kitchener-stitch the two hems together in the middle. That's one heck of a long length to graft, and I don't think I'll ever forget how to do the kitchener stitch.

What works: the headband is stretchy and comfortable. The edges are reasonably neat.

What doesn't: The top and bottom edges aren't identical, probably because my long-tail cast-on doesn't exactly match the standard bind-off. (What does? The cable cast-on?)

There's also a messy little area joining the beginning and end of the kitchener graft, since I was working in a circle. I'm not sure how to do that.

Finally, I've never been happy with the way I join a piece of circular knitting, both at cast-on and bind-off. There's always a visible jog.

I might try it again, this time creating a completely separate lining and using crochet to attach it to the headband at the top and bottom edges.

Or maybe I'll use a provisional cast-on and, instead of binding off, just continue knitting the lining with a different color, then kitchener-stitch it to the live stitches.

Or learn how to double-knit.

Tuesday, August 01, 2006

Don't Felt the Dog


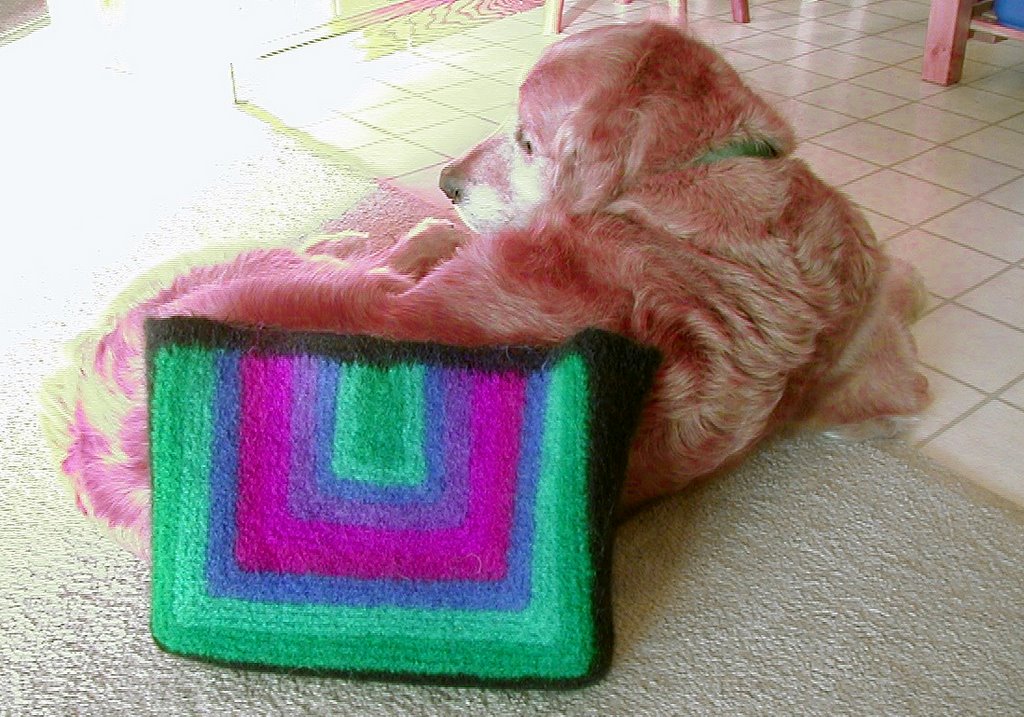
Y'know, checking gauge just might be important after all. This is supposed to be a small bag for carrying a paperback, keys, and a wallet. What I have here is a bag big enough to stuff half a Golden Retriever in. Finished measurements are 13" x 9 1/2" x 3 1/2", down from 16" x 11" x 4" before felting.

Other than the size issue, I'm happy with the bag. It calls for stuffed I-cord handles and a tab closure held by buttons on both sides. I'm sure I'd lose that tab, so I'm thinking about other ways to fasten it. A lining is definitely called for, as the top edge flared a lot in the washer. I pinned that sucker down like crazy while it blocked, but it'll need help to keep its shape. A nonstretchy lining should do it, as the felted fabric is quite sturdy otherwise. Making a lining will also give me the opportunity to add lots of little pockets for the cell phone, notepad, and pencils.

As happy as I am with the bag, I may end up giving it to my mom and making a smaller one, a true paperback rider instead of Golden Retriever tote.

Sunday, July 30, 2006

paperback rider


paperback rider
Originally uploaded by normanack.
From a pattern in Knitter's Magazine, summer 2006. It calls for a self-striping yarn, which I don't have. I do have lots of Brown Sheep Lamb's Pride worsted, so that's what I used.I followed the pattern except for adding three rows of single crochet around the top for stability. This is the bag before felting. It measures 16" x 11" x 4".

Tuesday, July 18, 2006

Knitting Fads, in a Good Way

Funny how, of the crafts I've tried, knitting is the one where we find fads sweeping across knittingdom. It can be a pattern, like the French market bag above, or the Clapotis shawl, both from knitty.com. Or how about Jaywalker socks, developed on a knitting blog and published in magknits.com? The Birch shawl also seemed to be on everyone's needles awhile ago. Some knitting books take on a life of their own: look at Mason Dixon Knitting. MDK is like a bag of potato chips -- you can't make just one project from that book. It has a thriving knit-a-long, and I'm betting that the makers of inexpensive cotton yarn are feeling an upsurge in sales.

I've been involved in quilting longer than knitting, and sure, I saw some fads there, too. Stack 'n Whack comes to mind. And crochet? I don't know the crochet world well enough, although Debbie Stoller's Stitch 'n Bitch: The Happy Hooker seems to have made a splash. It did have her previous books to give it a push (Stitch 'n Bitch, Stitch 'n Bitch Nation).

Are knitters more fad-conscious? Do they form a tighter community, simply more aware of what others are knitting? Or is the whole fad concept just my skewed perception?

On a different level, and without any market analysis to back me up, I'd claim that quilting was (and remains) a big craft phenomenon, growing throughout the 90s and continuing in the 00s. Knitting seems to have taken a bit of the excitement from quilting, and I hear that crochet is poised to take over in turn. But I haven't seen that happen. At my local stores, I see lots more knitting books than crochet. And the magazine market? Tons of quilt titles. A good handful of knits. And only a couple on crochet, and their projects often strike me as poorly thought out.

I'm glad that craft in general has found a renewed popularity. The process of making something both beautiful and useful (broad definitions on both those words) is so deeply satisfying, particularly when the object embodies a bit of our souls. I don't mean originality, exactly, although that's a part of any craft or art. The repetition of what so many others before us have done, the history of the action, also holds meaning. Your grandmother may have crocheted, or maybe Dad's old quilt is hiding in the closet. (Ooh! I should post a picture of my husband's childhood quilt. It rocks.) I love this aspect of craft.